E-WMS - Auto Queue
Introduction
This document describes the specifics and configuration of E-WMS
Auto queue, as per release 413.
Description
WMS Auto queue is available from product update 403, offering the possibility to automatically send order lines 'picking', without the need of having to start the Control Center and select and handle order lines manually.
This document contains following sections:
Supported processes
Auto queue is available for following processes, with or without using
Route Optimizing ('picking advice'):
- Sales Order Fulfillment (except Pick&Pack)
- generate picking advice (when enabled)
- send orders or picking advice picking
- Replenishment
- generate new replenishment orders
- generate picking advice for replenishment orders
- send advices picking
- required for 'real-time
Replenishment'
- Purchase Receipts
- send purchase order picking
- Production Issues
- generate picking advice (when enabled)
- send production orders or picking advice picking
Requirements and preconditions
Requirements
- License:
- One of following licenses is required for use of Auto queue for sales
orders and purchase orders:
- SE1380 E-WMS I
- SE1386 E-WMS Lite
- SE5700 Pick-IT Basic
- for Auto queue functionality in Production Issues, also one of following
licenses:
- SE4250 E-WMS Production
- SE5740 Pick-IT Production
- not possible for E-WMS Lite
- for Auto queue functionality for Replenishment:
- SE1381 E-WMS II (in addition to SE1380 E-WMS I)
- Usage of communication type 'Scanner - ASP'
- In general, it is an E-WMS requirement to run the E-WMS services on a
separate, dedicated PC. This requirement also applies to the Autoqueue service.
- The account used to run the Autoqueue service must have rights in the
warehouses used in the orders.
Following settings and conditions apply:
- The Auto queue service has to be configured for the correct database and have status 'started'
-
The Windows account used to run the Auto queue service, has to meet the general WMS service account requirements
- If you are using label printing integrated for the 'send to' step, the account used to run the
Auto queue service must be able to print these labels (printers are user specific)
- The setting 'Enable
Auto queue' has to be enabled for each process to be handled by the service
-
When 'Picking advice' is enabled, the setting 'Picking advice / Immediate picking'
should also be enabled, otherwise the order lines will not be sent picking
- The setting 'Send/export orders' in section 'Send to scanner' should be enabled (Receipts and Production Issues)
- The order has to have the correct status to be fulfilled or received (which means: authorized, confirmed or printed, when required)
- The
Auto queue service only handles orders from status ''New"
- The Auto
queue service only exports order lines that are planned for today + number of days configured in setting Days in advance
Settings
Auto queue settings and master data can be found in following menus:
- setting section 'Auto queue' in WMS Sales Order Fulfillment settings
- setting section 'Auto
queue' in WMS Receipt Registration settings
- setting section 'Auto
queue' in WMS Production Issues settings
- setting section 'Auto
queue' in WMS Replenishment settings
- maintenance menu System, E-WMS, Service schedules, Schedules
- maintenance menu System, E-WMS, Service schedules, Scanner group filters
Installing and configuring the Auto queue service
First install the new service, from the file at default location
C:\Program Files (x86)\Exact Software\INSTALL\E-WMS\SERVICES\E-WMSAuto
queueSetup.msi.
For general documentation on installation of the WMS services, please refer to How to install the E-WMS and ICL 'RF' services.
This service can perform following actions:
- generating a picking advice when required
- sending (advised) order lines to status 'picking'
- for all processes listed above
The CONFIG file which is installed with the service (default
C:\Program Files (x86)\Exact Software\WMS\E-WMS Auto queue
Service), has to be edited for the correct databases, and you can configure what timing factors you want to use:
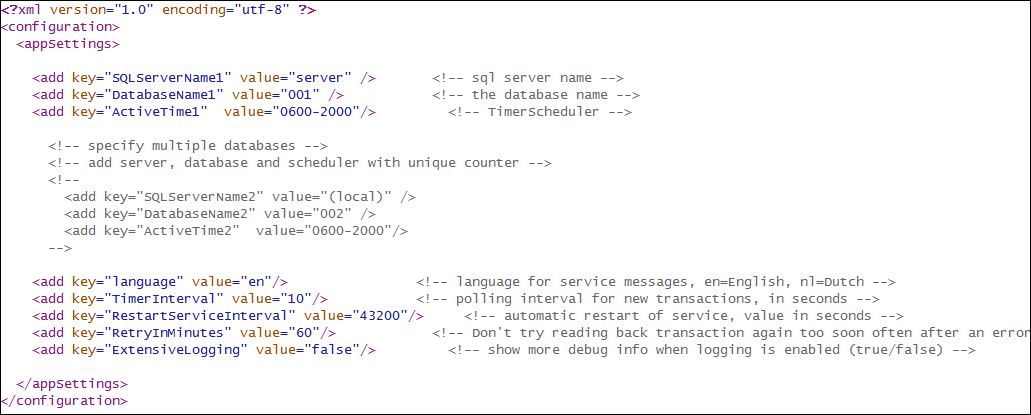
SQLservername
Contains the SQL server name (or IP address) and SQL instance name
Databasename
Contains the Globe database name.
For support of multiple databases, please read:
Multiple databases supported in the WMS RF services.
TimerInterval
Defines the interval the service will use to start scanning for new orders to be sent picking (default: every 60 seconds)
RestartServiceInterval
Defines the interval in seconds to restart the Auto queue service to free up memory (default: 7200 seconds = 2 hours)
DelayInSeconds
When a new order is just being entered, the Auto queue service should not try to handle that order because it can still be locked by the Globe user.
This setting determines how much time should be allowed after the last change of the order, before being handled by the service again.
RetryInMinutes
Defines the interval in minutes, the service will use to re-try orders which could not be exported earlier (due to insufficient stock, or not allowing partial delivery, or locked orders. Default 60 minutes).
When an error occurs during advice calculation, a new error record will be inserted into log table csPickitErrorReport, every interval of 'RetryInMinutes'. These messages can be viewed in the WMS RF monitor.
Please be aware, when decreasing this retry interval, the number of error records in csPickitErrorReport will increase accordingly.
ExtensiveLogging
For support use only, provides some additional information when logging is
enabled
Configure Auto queue
Enable Auto queue for any of the processes listed above, in the WMS settings for the specific modules. After changing settings, restart the
Autoqueue service (or, the service will read the changed settings on it's own scheduled restart interval).
Enable Auto queue per process
- To enable Auto queue for sales orders, go to menu System, General, Settings,
WMS Sales Order Fulfillment and enable the
setting 'Enable
Auto queue'.
- To enable Auto queue for purchase orders, go to menu
System, General, Settings,
WMS Receipt Registration and enable the
setting 'Enable
Auto queue'.
- To enable Auto queue for replenishment orders, go to menu
System, General, Settings,
WMS Replenishment and enable one or both
settings for Autoqueue.
- To enable Auto queue for production issue material lines, go to menu
System, General, Settings,
WMS Production Issuing and enable the
setting 'Enable
Auto queue'.
Service Schedules: limit auto queuing using daily
schedule or per warehouse
To be able to limit automatically filling the picking queue to a specific time frame during a day, or to order lines for a specific warehouse,
you can configure WMS Service Schedules.
Using these service schedules is not mandatory, without service schedules the service will handle order lines 24 hours a day, and for all warehouses.
You can read more about maintenance of E-WMS service schedules in document
E-WMS - Service schedules.
Filtering and assigning to scanner group
When sending orders picking manually in a control center, you are able to
filter order lines: split order lines to different scanners. To offer filtering
functionality in combination with Autoqueue, you are able to define scanner
group filters. You can read about maintaining these in document
E-WMS - Scanner group filters.
Consequences and points of interest
- When using E-WMS and an order line is sent picking, the order line will be blocked to prevent changes in Globe order entry. Also when
Auto queue is used, all order lines that are sent picking, will be blocked in Globe.
- When manually rolling back an order, it will
not be sent immediately picking again by the Auto queue service; for
these orders the RetryInMinutes interval (see service configuration
above) is set and applied.
It is assumed that rolling back is an exception, and sending 'picking' again
can be done manually, or else this will be done automatically after this interval.
- Order collection:
- If WMS order collection is enabled: all orders handled at one point in
time by the service, are collected in one picking order (order browser list shows the highest order number in the collection).
- Collecting orders may not work as well as with manual handling of orders, since the entry
sequence of the orders (+printing/authorization) is decisive for the sequence of order handling by the service. Using 'service scheduling' may solve this again, and still handle multiple orders as one batch to be collected for picking.
- Collecting orders is only applied to the batch currently sent picking. When new orders would be entered and sent later for the same (collection) debtor, this will always be a separate picking order on the hand terminal, and will not be added to a current picking list for the same debtor. Collecting may work
better combined with a service schedule, in case the service is scheduled to start after all orders for that day should have been entered.
- Using the WMS 'Urgent' status for orders may not work well when using the
Auto queue service, since the moment of order entry determines when an order will be sent picking. But urgent orders will always show on top of the picking list
on the scanner, even when entered and sent picking later.
- When you are using Auto queue, and you process a partial issue or
receipt, while putting the remainder into backorder while stock is available, that backorder
will be sent picking immediately again by the Autoqueue service - unless you
configure the WMS (process) setting 'Days in backorder' to a value larger
than 0 days or to fixed date '31-12-2299' (combined with the Auto
queue setting 'Days in advance').
- If you are using BarTender labels in the 'send to scanner' step, this printing will now be done by the service (see 'preconditions' above).
- When manually selecting orders to be picked in the Control Center, the available stock is advised by your selection sequence ('clicking order') in the control center (first order selected=first gets
available stock). When using
Auto queue, the entry sequence (+printing/authorizing order) is decisive for which order gets the available stock first,
combined with the 'Timerinterval' of the service. When service scheduling is used and a whole batch is sent picking for example in the afternoon, then the urgent status and order number sequence determines the order in which available stock is advised.
- The setting 'Ask user' (Communication method) in the WMS settings is ignored in the
Auto queue service, and always assumed 'off'. This way, you are still able to use this setting for manual 'send to scanner' actions.
- When using Scanner group filters:
- It is best practice to configure filter rules which cover all
possible advice lines, and which also exclude each other:
- when a picking advice is generated but the advice does not match
any of the configured scanner group filters, then no error will show
in RF monitor. The advice lines will remain in status 'Advice'. This
means that either status 'Advice' has to be monitored, or the
group-filters should always cover all possible location- or item
ranges. Generated advice lines result in E-WMS stock reservations,
where this stock is not available as advice for other orders or for
WMS transactions like transfers.
- When you have configured multiple scanner group filters which do
not exclude each other (e.g.: scannergroup 1: itemgroup '0',
scannergroup 2: itemgroup '1' and scannergroup 3: 'bulk locations')
then it will random which filter rule will be applied first to an
advice line which meets criteria from 2 groups, since the filter
rules are retrieved without a specific sorting order.
- You can assign a specific scanner group only once per E-WMS module.
This may have to be taken into account e.g. when assigning alphabetical
logically codes to your E-WMS zones. Example: you can assign zone range
A01 until A99 to scanner group 1, but you cannot assign zone A01 to
group 1, zone A02 to group 2 and zone A03 again to group 1.
- When an order does not match a group filter at all, then no error
will be shown in WMS RF monitor (changed
from 413SP8, 414SP1 and 415)
- Order lines stuck in status Advice (or when a picking advice was
generated manually) are not handled by the Auto queue service. The Auto
queue service only handles orders lines starting from status 'New'.
- When a picking advice is generated for only part of the order (e.g. 1
order line of total 5 order lines has no stock), then this will not be shown
as error at that time in WMS RF monitor. This can be compared to manually
generating a picking advice for this order, where only the detailed 'OK'
report shows that one order line has no advice - but no error report is
generated for that order line.
- Via the 'From all warehouses' setting you can define if the auto queue
functionality should look at all warehouses as a source for replenishment. For
more information, see System, General, Settings,
WMS Replenishment settings.
Troubleshooting
- Error shows in RF Monitor for Auto queue process : "Order ( 50000001): No lines found, that can be fulfilled".
> This error will show when you have defined scanner group filters in menu System, E-WMS, Service schedules, Scanner group filters and when orders to be exported do not match those filters
Please be aware that these order lines will be 'stuck' in
status 'Advice' and have to be rolled back to 'New' manually.
This error is
no longer shown by the service after updating to 413SP8, 414SP1 or
higher.
- Orders are not exported.
- Order should have the right status: it should show in status 'new' in
the WMS control center
- Orders remain in status 'new':
- the order line delivery date does not match the 'Days in advance'
Autoqueue setting
- the order line warehouse does not match the Autoqueue service
schedule configuration
- the orders are rolled back quite recently. In that case the orders
are ignored by the Auto queue service for the duration of the
'RetryInMinutes' period. You can force re-sending these orders by
setting the field orkrg.CSPICKITLatestTryInService to NULL, or for
production orders the field prproject.CSPICKITLatestTryInService
- the order was handled by the service but there was insufficient
stock. In that case the RF Monitor should show 'No advice generated' and
the interval RetryInMinutes is applied for this order
- service should be up and running and configured for the correct database, see
preconditions
- the current time is an inactive time for the service (service 'ActiveTime'
configuration)
- you are using a WMS
service schedule and the start time
has not been reached yet
- Orders remain in status 'advice':
- filtering prevents the order to be sent 'picking' (check System, E-WMS, Service schedules, Scanner group filters)
- the order line warehouse does not match the configured scanner group
filters
- Orders are visible in status 'picking' but do not show up on the hand terminal.
> see
this document
Related documents
| Main Category: |
Support Product Know How |
Document Type: |
Support - On-line help |
| Category: |
On-line help files |
Security level: |
All - 0 |
| Sub category: |
Details |
Document ID: |
22.897.973 |
| Assortment: |
E-WMS
|
Date: |
04-10-2018 |
| Release: |
|
Attachment: |
|
| Disclaimer |
|
|